Tuesday, December 28, 2010

Made with love for family and friend because I want to!

 This one was made for my friend with love to give to a family member as she had need and was in a hurry on the wrong day and I had the time and was inspired on the day:) 


Just loved working with this stack from her stash, so bright and uplifting.  Embellished from my stash.  xx


This one was made as a colour challenge designed to suit one person and turning out to better suit another!  My own hand made shabby chic (aka distressed) flowers.  Thanks for looking :0) xx

Saturday, November 27, 2010

Sue's Birthday - Purple, antique, a touch of France...


 Oh I had such fun with this one, so purple!  I really like the antique look and bit of distress I've added, mostly with ink, just a little "distressing" to the edges in places and with the chunky stitching.  Love this Guitterman thread!  This colour bought from Daisy Chain Scrapbooking Store in Nambour Qld.


Images - Photo stamp and verse from Daisy Chain retreat weekend, papers from Cosmo Cricket Mitten Weather Mini Deck -LOVE IT!  Flowers, lace and pearls, various purchased from Bizzy Becs,   Cuttlebug used for shapes and embossing, braid from Hollyhock Cottage and velvet ribbon from Cooroy Drapery.  Will post the stamp set's details when I find them!!! 

 Below I've put two photo's of this same card front, I was experimenting with background colours and am amazed at the different effects you get, what makes our work POP and what makes it disappear.  I really liked this on both the brown and while backgrounds but it does appear to have more contrast on the brown I think, brighter on the white perhaps?  What do you think?  What do you personally prefer for posting?

Below is just a touch of detail to show you the lovely thread and bit
of distressing applied to the edges.  Also the full inside.  I really liked the vaguely monochome concept with the added brown for "antique" look and cream to lighten the whole.  
Lastly, if you have seen this add on TV you will get where I was going with the stamped verse - "Charter boat!  What Charterboat".  I think it's an RACQ add???  Anyway, when I read this, I heard this woman reading these words in my head and I thought it was hilarious!  


I wish Blessings for you all.  Dawnie. xx 

Sunday, November 14, 2010

Yes, I've been making cards, no I haven't forgotten to post!

Laptop went to heaven so I've got to re-load all my photos and start again.  When we only have the PC in this house there are sometimes issues with who's gonna use it when so I just caved didn't I!  What a pushover!!! ;) xx

Saturday, October 30, 2010

Bizzy Becs Store Blog: Freebie Digis For You

Bizzy Becs Store Blog: Freebie Digis For You: "Hi All, I was having a play on the computer today and came up with these Digi sentiments that I was going to use on some cards.. I thought ..."

Thursday, October 21, 2010

French Connection - for Francoise of Maison de Provence with love xx


 This is my favourite card so far I think, which I hope speaks for itself; mainly because I made the cream pattern paper from scratch myself and because of the awesome, flamboyant, amazing woman it has been given to (and her incredible family).  Her expectations of my creations led me to aim for heights I would not nor could not ordinarily spend the time to reach but on occasion it's nice just to spend the time just because.  

Francoise, her husband Eric, grown son & daughter (my only and very special French friends) along with their TRIPLET sons now TWO, are happy owners of the French Tea House & gift ware business called Maison de Provence newly re-opened in Cooroy.  We sadly miss them in Pomona but wish them every success in this new incarnation of Maison.


 The cardstock (Very Vanilla, Always Artichoke & Bravo Burgundy & Chocolate Chip) is accompanied by pattern paper from a 6" Stack in my stash.  All the edges are distressed with my free and favourite "fingernail technique" as well as edges inked, smudged and sponged.
The Very Vanilla was first lightly stamped using Stampin Around Wheel "Antique" using Creamy Caramel & Mellow Moss inks.  Then I used pieces of this to make the Card front "face" on which I've stamped the Eiffel Tower then cut out it and the mats with Spellbinders nestable labels.  The artichoke layer is embossed with cuttlebug texture folder and inked with off white and gingerbread chalk inks and then I've trimmed this by hand with scissors on the embossed edge and cut a chocolate mat to fit nicely behind.

All the other lightly "antiqued" vanilla pieces I have stamped with the remainder of the stamps from this set (Purchased from her original store in Pomona several years ago Pre-triplets) to make the patterned paper, stamp, post mark circle and "Paris" sign.  They have then been cuttlebug dry embossed using various folders, inked, sponged and variously distressed, matted and foam mounted.  I hope this photo's show some of the detials.


This Camelia like flower I made myself with leftover hand made pattern paper and loosely interpreting the instructions from Magnolia Magazine (#3?), distressing it in my own fashion.  I have really gone to town with these and am now branching into different sizes and using different punches to make variations.  I love that they match the project so perfectly.  This one is suitably flamboyant and spritzed with Glimmermist and touched with Stardust stickles.


Saturday, October 9, 2010

Simple Easel Card (variation) made from bits and pieces

Leftovers (including the pattern paper) were used from my previous project (and posted card) with some added bits and pieces.  These colours really make me think of Autumn in Australia, the sky is so blue and the river and sea so green but we still have some changes of foliage in the hinterland...  

Next time I think I would leave the "face" just a little bigger, overlapping the actual Easel by perhaps 1cm either side rather than 6mm or by as much as might take to fill a business envelope for another variation - the ideas are flying this morning!!!

The stamped sentiment is from Daisy's workshop and punched with their scallop punch which I LOVE.  I messed this image up when making the first card but by distressing with gingerbread chalk ink you can't see where I smudged the image and so it was saved.  It was a very wet day and ink was not drying as usual.  I have found there are very few "mistakes" in paper craft that can not in some way be taken advantage of! ;)

The Doily is spritzed with Wheatfields Glimmer Mist to make it less white.  The Sage paper has been embossed with my new Cuttlebug folder and then inked to create a shabby pattern that would match the overall effect and then sewn with zig zag to the cream card face. 

The cardstock is Very Vanilla & Sage from Stampin Up; ribbon is from my stash and there is also a punched lace border which the face is resting on - Martha Stewart punch which I threaded gold ribbon through for a bit of extra sparkle.  All edges are inked flowers from Stash:)

Handmade Gardenias on funky fold card

 Hi folks

This is what I spent a good part of my retreat weekend perfecting.  The fold and flowers were popular and I ended up asking Barbi if I could do a little lesson.  Certainly having a scor pal helps.

You can find the instructions for the flowers in Magnolia Magazine, I think it was Issue 3. 
The Pattern papers are from a new DCWV Stack called Linen Closet - thank you Debbie for passing on the details of this, you are right, the papers are so ME!  These have been distressed, inked, embossed & or lightly stamped for the shabby effect below.

 Alternate panels were stitched with thick Guitterman thread and opposite alternate insides were foam mounted; pieces of pearl scrolls were added for details here and there.  The bow is ribbon from Daisy Chain as were the yellow roses. 

The stamped sentiment is Daisy and the shapes are cut with Spellbinders Nestibles.
 These two larger "camelia" style flowers are my own home made using scrap pattern and plain cardstock, which has been punched, inked, bradded and then wet scrunched before shaping.  Once partly dry they have had pearl stickles (which is sort of opaque) applied around the top most edges and folds.
Just have a go with the flowers, everyones look a little different depending on how much you scrunch them and how much time you spend moulding each petal.  Some made lovely cabbage rose versions and Barbi and I made mini variations using 4 small and 4 medium punchies.  It was also fun to experiment with different punches.

Forever Friends Christmas

Guess who bought a new paper pack for making Christmas cards;)

This was just too easy but sometimes that's all you need when the papers are as nice as these Pattern papers from Forever Friends Cosy Christmas 6" Paper Pack!  I bought the pack while at the Daisy Chain Scrapbooking Store Card Camp (retreat:)) where I also stamped the sentiments with memento black (I think they were Stamp It)

I've added mats in Real Red which I inked with black.  

Inside features Always Artichoke and Very Vanilla Cardstock all from Stampin Up;  Pewter Pearls from BizzyBecs, Ribbon also from Daisy.  Shapes cut with Spellbinders and one was embossed with Swiss Dots for a little texture.

Aside from that my only embellishments were to ink the remaining edges with Gingerbread Cats eye (chalk ink - memento) to soften them and lastly, for a little dimension I add White Flower Soft to his bobble (the pom on top of his hat!) 


Monday, October 4, 2010

Elegant feminine birthday card

This I created for my sweetest friend Debbie C who is one of the kindest, nicest most calming presence I have had the pleasure to know.  She is a most elegant and gifted lady; you can see her blog at http://debscardsandscrapbooking.blogspot.com/  I consider myself most fortunate to have such friends.  
Stampin' Up created the stamp of this sweet figure, as is the Taken with Teal & whisper white cardstock.   I've coloured with Copics and highlighted her ribbon and dress with Clear Spica. 
These prettiest of papers are from pattern paper pack Summer Bloom from Papermania, I've stitched the hummingbird paper to the Teal and cuttlebug embossed the pink spot mat with a rose design..  Shapes are cut with Spellbinders Label Nestibles. 
 Organza ribbon, pearls and pin from stash.  I've spritzed paper and flowers with pearl Glimmer Mist.and added Stardust Stickles to the Roses as well for added bling!

The lining is made up of textured Teal Cardstock, matching pattern paper and doilies stamped with sentiments make up the inside.  Edges of doilies are inked with pink and teal although this does not really show the dimension this adds.

13 Teen boy

This is a card created years ago which I have chopped up and turned into an easel card for a young friend of mine.

I took the face "Happy Birthday" which was mounted on the netting backgrounds and added lots of Elegant Eggplant mats, pop dotted a matted silver bling sheet which I have distressed with gold Webbing spray; then I have grunged it up with lots of black ink.   The chipboard letters and arrows I distressed with ink and spritzed with red and blue based glimmer mist and I also added the wire for that more masculine looking medium.

Here you can see the glimmer mist and glitter paper details.  Lastly I created the Easel card base, made a lining to match the face and stamped sentiments from various sources.  More wire creates a rest for the face to make an easel shape.  The webbing has been stamped over with a netting stamp and distressed by wiping.  I also distressed a grey envelope with more black ink. 

Sunday, October 3, 2010

I'm saving my French creation Easel Card for last so my next few will be from retreat this weekend;) xx

Saturday, September 25, 2010

Pretty Pink Wedding for Carmel to gift Amy

I made this one to order for Peter's Sister Carmel to give to her Granddaughter for her Wedding Day in October - no they don't know about my blog! ;)  My instructions were very limited, "She likes pink, it's for her Wedding day in October".  Nothing else which made it easy and difficult at the same time.  Initially I was thinking just pink and white but it looked a bit too girly and feminine, by incorporating a bit of black and grey I think it formalises the whole affair, add's a hint of masculinity (think Men in Black/Grey suits) and helps by adding contrast to the end result.

All card stock Stampin Up - Whisper White, Going Grey and Pink Pirouette.  The pattern paper is a scrap from a Wedding Stack which was given me by a friend - thanks Deb C:)
The cake is one of my friend Sharons Magnolia Stamps which I have stamped twice, cutting out the whole cake and from the second image taking the bow, mounted with tiny thin foam squares.  
In hind sight I would do this in 3 layers making the plate my bottom layer, then the cake, then the bow.  Three pink copics were used to colour the cake and the clear Spica pen was added to the bow and icing(plate) below the cake.  Pearls from stash were used to highlight the larger dotty pattern on the cake and stickles to the smaller ones.  The whole thing was spritzed with Pearl Glimmer mist.


The Oval is Cuttlebug embossed with small hearts then mounted on pink pirouette scallop oval (Spellbinders Nestables) and the rectangle "label" behind was cut down at the embossed edge and then embossed with Swiss Dots before mounting on Going Grey and stitched together with white cotton using grey in the bobbin to high light the stitching holes.  Edges inked with Pink and black inks and foam mounted between the double layers for added dimension.
Lacey border panel punched with borrowed Martha Stewart Punch and enhanced with pink organza ribbon with pretty silver detail edges and a heart charm dangles on chain links from the bow.  Doily mounted on the pink and spritzed with the pearl glimmer. 
The back panel of the Easel card is made from Pink Pirouette, Going Grey and Whisper White embossed with the small hearts and all edges inked with black.  The grey & white are stitched together with Grey cotton for extra detail before mounting on the pink again with foam and then attached securely to the Easel. 
hearts from stash.
 

Lions Share - Be Well Easel Card

I just love how this turned out.  The Patchwork style really suited Elsa as she sews and I hope the lion conveyed our sadness at not being close enough to visit but our strength, hope and prayers for her recovery.  

Lion is Magnolia Safari, image gifted by a friend, coloured with Copics and mane and tail highlighted with clear Spica pen for a bit of glam!  He was cut out and mounted on a glimmer mist spritzed Scallop Circle (Spellbinders Nestabilities) which was then foam mounted onto my "patchwork" of beribboned pattern paper (all are DCWV 12" stack) zigzag stitched to pink pirouette (this and all other card stock are Stampin Up).  

This card face was again then foam mounted onto the final straight stitched layer of green spot stitched to pink before attaching to the final Easel style card.  Gold bling, ribbon & organza from stash.  

Heres some close ups for detail of colouring his mane, flowers and layering.  Flowers from stash, roses are from Wild Orchid & Bizzy Becs.  Some of the stems have been twisted around a skewer to make tendrils to take the place of leaves.  All the edges have been inked with pink on green patterns and green ink on pink toned papers with Momento cats eye chalk ink

Kurts birthday


For the fisherman, he still doesn't have his card as he joined the Navy and went off to sea and we haven't seen him since!!!  Oh well, if I don't see him before he will have it next year! ;)
Pattern Papers and Cardstock is Stampin Up from last years purchases, Pelican stamp & "Net" is Lucy, coloured with Stampin Up markers where required; fish were borrowed from a friend and have been cut out and embossed with bronze and gold to show their darker upside and lighter bellies. Instead of inking the edges I used my Stampin Write markers to get into the corners and "ink" the edges.  Although the fold is unusual this was a very simple card to put together.

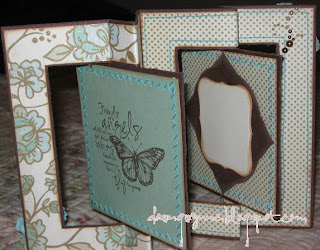
Sharons birthday in May - new funky fold found on Split Coast


So here it is girls, I just love how this card turned out, it was my first attempt with this fold (even tho Kurts below appears on here first!) and I'm sure to use again. It was difficult the first time to get the swing so I would recommend doing a trial with scrap paper.

 Roses from Wild Orchid, Flowers & spotted ribbon from stash, Pattern paper & cardstock is all last years Stampin Up so I won't go into details as they have a whole new catalogue now.  The cute shape mount cut out using Nestibilities Labels and is my fave shape.  The very elegant shopping lady was stamped, coloured with Stampin Up markers to match the papers and cut out and then mounted onto that white shape (which is spritzed with Glimmer mist).  

I purchased these two stamps at last years Queensland birthday weekend craft fair, a great time away with girl friends.  They are hidden safely somewhere in my stash so I will have to try to post these details later.  I often carry stamped images on white and vanilla for colouring in to match cards I'm making so I don't always have the details at hand - the downfall of this plan.  However I find having the images on me at most events I have a good range to choose from and don't have to carry all the stamps all the time.  Mobility is an issue!!! ;)

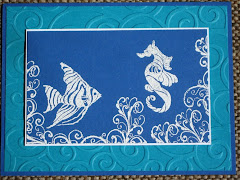
Ocean friends

Ocean friends
Ocean Commotion stamped with Versamark and embossed with White on Brilliant Blue Cardstock, Whisper White and Taken With Teal which has been cuttlebugged.

Short on time? Have a quick peek!

Powered By Blogger

www.thecutestblogontheblock.com