Saturday, September 25, 2010

Pretty Pink Wedding for Carmel to gift Amy

I made this one to order for Peter's Sister Carmel to give to her Granddaughter for her Wedding Day in October - no they don't know about my blog! ;)  My instructions were very limited, "She likes pink, it's for her Wedding day in October".  Nothing else which made it easy and difficult at the same time.  Initially I was thinking just pink and white but it looked a bit too girly and feminine, by incorporating a bit of black and grey I think it formalises the whole affair, add's a hint of masculinity (think Men in Black/Grey suits) and helps by adding contrast to the end result.

All card stock Stampin Up - Whisper White, Going Grey and Pink Pirouette.  The pattern paper is a scrap from a Wedding Stack which was given me by a friend - thanks Deb C:)
The cake is one of my friend Sharons Magnolia Stamps which I have stamped twice, cutting out the whole cake and from the second image taking the bow, mounted with tiny thin foam squares.  
In hind sight I would do this in 3 layers making the plate my bottom layer, then the cake, then the bow.  Three pink copics were used to colour the cake and the clear Spica pen was added to the bow and icing(plate) below the cake.  Pearls from stash were used to highlight the larger dotty pattern on the cake and stickles to the smaller ones.  The whole thing was spritzed with Pearl Glimmer mist.


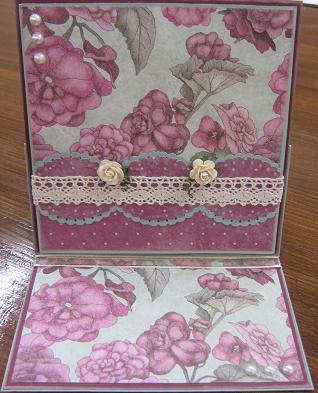
The Oval is Cuttlebug embossed with small hearts then mounted on pink pirouette scallop oval (Spellbinders Nestables) and the rectangle "label" behind was cut down at the embossed edge and then embossed with Swiss Dots before mounting on Going Grey and stitched together with white cotton using grey in the bobbin to high light the stitching holes.  Edges inked with Pink and black inks and foam mounted between the double layers for added dimension.
Lacey border panel punched with borrowed Martha Stewart Punch and enhanced with pink organza ribbon with pretty silver detail edges and a heart charm dangles on chain links from the bow.  Doily mounted on the pink and spritzed with the pearl glimmer. 
The back panel of the Easel card is made from Pink Pirouette, Going Grey and Whisper White embossed with the small hearts and all edges inked with black.  The grey & white are stitched together with Grey cotton for extra detail before mounting on the pink again with foam and then attached securely to the Easel. 
hearts from stash.
 

Lions Share - Be Well Easel Card

I just love how this turned out.  The Patchwork style really suited Elsa as she sews and I hope the lion conveyed our sadness at not being close enough to visit but our strength, hope and prayers for her recovery.  

Lion is Magnolia Safari, image gifted by a friend, coloured with Copics and mane and tail highlighted with clear Spica pen for a bit of glam!  He was cut out and mounted on a glimmer mist spritzed Scallop Circle (Spellbinders Nestabilities) which was then foam mounted onto my "patchwork" of beribboned pattern paper (all are DCWV 12" stack) zigzag stitched to pink pirouette (this and all other card stock are Stampin Up).  

This card face was again then foam mounted onto the final straight stitched layer of green spot stitched to pink before attaching to the final Easel style card.  Gold bling, ribbon & organza from stash.  

Heres some close ups for detail of colouring his mane, flowers and layering.  Flowers from stash, roses are from Wild Orchid & Bizzy Becs.  Some of the stems have been twisted around a skewer to make tendrils to take the place of leaves.  All the edges have been inked with pink on green patterns and green ink on pink toned papers with Momento cats eye chalk ink

Kurts birthday


For the fisherman, he still doesn't have his card as he joined the Navy and went off to sea and we haven't seen him since!!!  Oh well, if I don't see him before he will have it next year! ;)
Pattern Papers and Cardstock is Stampin Up from last years purchases, Pelican stamp & "Net" is Lucy, coloured with Stampin Up markers where required; fish were borrowed from a friend and have been cut out and embossed with bronze and gold to show their darker upside and lighter bellies. Instead of inking the edges I used my Stampin Write markers to get into the corners and "ink" the edges.  Although the fold is unusual this was a very simple card to put together.

Sharons birthday in May - new funky fold found on Split Coast


So here it is girls, I just love how this card turned out, it was my first attempt with this fold (even tho Kurts below appears on here first!) and I'm sure to use again. It was difficult the first time to get the swing so I would recommend doing a trial with scrap paper.

 Roses from Wild Orchid, Flowers & spotted ribbon from stash, Pattern paper & cardstock is all last years Stampin Up so I won't go into details as they have a whole new catalogue now.  The cute shape mount cut out using Nestibilities Labels and is my fave shape.  The very elegant shopping lady was stamped, coloured with Stampin Up markers to match the papers and cut out and then mounted onto that white shape (which is spritzed with Glimmer mist).  

I purchased these two stamps at last years Queensland birthday weekend craft fair, a great time away with girl friends.  They are hidden safely somewhere in my stash so I will have to try to post these details later.  I often carry stamped images on white and vanilla for colouring in to match cards I'm making so I don't always have the details at hand - the downfall of this plan.  However I find having the images on me at most events I have a good range to choose from and don't have to carry all the stamps all the time.  Mobility is an issue!!! ;)

Sunday, September 19, 2010

I'm catching up!!! Be back in a few days with more:) xx


This stamped image was gifted to me by a friend to use for my Brothers birthday so I'm sorry I don't know who the stamp designer is to post that information, perhaps someone else can add this in comments if they know...  Chris has suffered a mental disability since early childhood but is just mad about trains!  


This gorgeous "Steam passenger train" was coloured using a Real Red Stampin Up marker and a water pen to blend and then cut out.  The whole train was inked with a watermark inkpad and heat embossed with clear and then UTWV embossing powders to make it hard and glossy.  
The basic black, whisper & gloss white and real red cardstock are Stampin Up, the red is embossed with cuttlebug swirls and the pattern paper is from a DCWV 12" paper stack called "La Creme"; ribbon and brads are from Daisy Chain.  


The gloss card the train is mounted on (using foam)is hard to see but I made a marble background using the Shaving Cream technique with Stampin Up repinkers in various Soft Subtle shades (certainly celery, barely banana, lavender lace and mellow moss) giving a very loose impression of steam, hills and grass.
Paper edges are inked in Red with Colourbox Chalk cats eye ink pad.

Saturday, September 18, 2010

A day at the Races

Peters birthday card - he's very into racing, a family tradition among his Brothers.  


The chip board horse and rider were inked and spritzed with Glimmer mist.  The chipboard "A day at the Races" was whole and has been cut through to separate and only sparingly inked to create the "distressed" colouring.  


Pattern papers and Bazzill card stock from the Daisy Chain Scrapbook store in Nambour.  Each piece is made separately, inked edges with Gingerbread cats eye and carefully hinged, then attached to the back face plate last.  There is another layer of cardsock on the back face to make it all stand more firmly and help hold the hinges in place.


Flowers are from Stash, roses from Wild Orchid and Bizzy Becs.  Stems have been twirled around a skewer to create "tendrills" and are glue dotted to the card.  They make a great anchor to keep the card closed when flat.


The whole card was then spritzed again with Wheatfields Glimmer Mist upon completion.
The card stands a little off kilter but offers a different view breaking up the overall image of the card and making it easier to fit it between others on display:)
The other inside view:)
In side right view of hinged card.  My variation of a fold idea found on Split Coast, I changed it's hinging - sorry it's too long ago to name the original designer but I thank you.

For Mothering Day - Easel Card

Hi again, as you can see I'm catching up on my posts.  


This was from Mothering day.  My Mum & Aunty are English and my Aunt (also my Godmother) celebrates the English rather than the Australian version of Mothers day.


Pretty Begonia paper and spot was a gift from my friend Debbie.  Cardstock from Stampin Up.  Cardstock front foam mounted onto burgundy layer before attaching to the Easel.  

Roses from Wild Orchid, Franchville Pearls and Lace from the local habadasherie.


"Diamond Lace" Large Scallop edge punch is by EK Success and purchased from Daisy Chain.
Here you can see the inked embossed and foiled dots details and the pretty pattern paper and decadent but formal braid.

Some details from my Valentine:)

Valentine for Darling Peter

We don't do "Valentines" in our house, well we do but not just in a Valentines Day "holiday" style valentine


It's so we go with a whim when you feel like it - the belief is that you shouldn't just celebrate your relationships on one particular day:)


Cardstock Stampin Up.  Pattern paperand Braid from Daisy Chain in Nambour, 1/2 pearls were picked up in Big W, and bows from habadashery.  


Edges of all layers inked with GingerBread Catseye as well as onto the embossed Pattern paper which is embossed in the cuttlebug with swiss dots.  


Some gold and other metalic foil is randomly smudged into place with a finger painted splodge of glue.  


Inside are two green bling hearts.

Gift sleeve for chocie:)

A simple gift sleeve for hiding a friends favourite treat, complete with ribbon pull access.  This simple lesson came from a friend, Debbie L, thank you:)  The sleeve is made with the circumferance of your chocolate bar plus about 10mm to allow it to slide.  The bottom is closed with red tape and  sealed and decorated by crimping (or in my case scoring - I did this by alternating sides every 1/8 inch for about 5 or 6 score lines.  Similar effect is achieved.  Decorate around with pattern papers and bling of your choice, I punched this pretty lace edge on some of my pattern paper to soften the edge.  Punch oblong slit (Stampin up punch) to insert ribbon, run through to other side.  Insert choc and then tie off ribbon after dropping carefully into sleeve.


My posts are going to be out of order for a while as I am struggling to upload some photo's.  Thanks for looking!

Ocean friends

Ocean friends
Ocean Commotion stamped with Versamark and embossed with White on Brilliant Blue Cardstock, Whisper White and Taken With Teal which has been cuttlebugged.

Short on time? Have a quick peek!

Powered By Blogger

www.thecutestblogontheblock.com